

Perhaps a friend gives you a pen drive, a colleague works late on your office PC or you decide to sell your old laptop. In any of these situations there is one important question that comes in mind which USB devices have touched this computer? If you are wondering how to check USB drive history on Windows 11 here is a good news for you that Windows automatically maintains a record of this.
You can simply get this all information in just a few minutes as I will share you with some easy tips and Windows free built-in tools that will solve your problem. This detailed guide will provide you complete information and a step by step easy methods on How to Check USB Drive History on Windows 11 also let you know what this record can cannot prove. You will get a bonus idea about how to block USB ports to keep your data from being transferred out.
Quick Answer: How to see history of USB devices on windows 11?
If you are a Windows 11 user and want to quickly Check USB Drive History without reading complete article or if you are a beginner users then these 3 methods are for you. Windows 11 stores a record of every USB storage device including pen drive and external hard disk that was connected but even after it is removed you can still see it in three places as explained below.
- PowerShell (Get-PnpDevice)
- Registry (HKLM\SYSTEM\CurrentControlSet\Enum\USBSTOR)
- Device Manager > View > Show hidden devices.
Once you find the record using these three quick method now you will be able to see your device name, its ID and first and last connection time. It does not show you details of which files were copied or who were involved in this. Now if you want to stop copying then you need to block your USB ports and this can be done either by choosing a dedicated tool or simply use Windows policies.
Quick Facts to About USB Device History
- Windows saves USB drive history so it can recognize same drive when connected again. This is a normal feature not a spying.
- The record is only about storage devices so keyboards, mice and webcams do not appear in USBSTOR.
- It is not permanent so one can easily remove entries and a proper Windows reset reinstalls OS and its records.
- It is also not proof of data theft as it only shows a device was connected.
- File copies tracking only works if it was enabled auditing before the event occurred.
Why Windows Remember USB Drives After Unplugging Them?
This is the first thing that most people ask Does Windows keep a record of USB devices? Yes. Windows Remember USB Drives After Unplugging Them and there is a very normal reason for it.
When you plug in your USB storage device even just for a few seconds here Windows simply creates registry information for it. Microsoft has clearly explained that Windows cannot distinguish between whether you have removed your drive temporarily or permanently; therefore, it simply retains this entry. So the next time you plug in the same drive then Windows can set it up faster using what it already knows. This feature is part of Plug and Play.
Microsoft calls the leftover entries of removed devices as non-present devices or phantom devices. On the other side Linux and macOS also keep hardware information and logs for the same practical reason. So it can be understood that this isn’t just a Windows related habit.
What USB Drive History Shows and Does Not Show
In order to know how to see history of USB devices it is also good to know before you check anything that what you can expect to find. This will save you from wrong conclusions.
| What you may find | What you will NOT find |
|---|---|
| Device name: “SanDisk Ultra USB Device” | Not a list of files |
| Hardware ID and instance ID | No proof of file copied to or from the drive |
| When Windows first installed the device | Every single time the drive was plugged in |
| Last arrival and last removal time | Who physically plugged it in |
| Drive letter that was assigned | Records for keyboards, mice or webcams |
How to Check USB Drive History on Windows 11 (Follow 4 Proven Methods)
Windows provides few built-in locations where you can find information about previously connected USB devices. These following methods are simple and proven that will explain to you where to look, what information is available and how to understand the results easily.
Method 1: How to Check USB Drive History Using PowerShell
If you want easy and simple way then this method is the cleanest way to Check USB Drive History on Windows 11 and Windows 10 also you do not need to edit the registry.
- Step 1: Start with right clicking on the Start button and open Terminal (Admin) or Windows PowerShell (Admin).
- Step 2: Find command below and simply paste this and then press Enter:
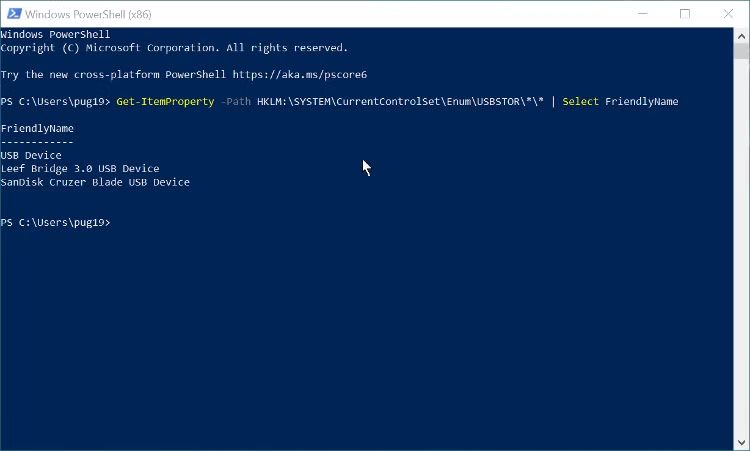
Run This Command
Get-PnpDevice -Class DiskDrive | Where-Object { $_.InstanceId -like 'USBSTOR\*' } | Format-List Status, FriendlyName, InstanceId
By implementing this command you will see every USB storage device that Windows knows about whether it is connected now or not.
- Step 3 (how to tell what is connected right now): For this you need to run same idea with -PresentOnly:
Run This Command -PresentOnly:
Get-PnpDevice -PresentOnly -Class DiskDrive | Format-List FriendlyName, InstanceId
If you find that your drive appears in the first list but not in this one so it was connected before and now it is removed.
- Step 4 (how to see when it was connected): Just copy the full InstanceId of the drive and then you need to run the given command:
$deviceId = 'PASTE_THE_FULL_INSTANCE_ID_HERE'
Get-PnpDeviceProperty -InstanceId $deviceId | Where-Object { $_.KeyName -match '_(FirstInstallDate|InstallDate|LastArrivalDate|LastRemovalDate)$' } | Format-List KeyName, Data
| Field | Meaning in simple words |
|---|---|
| FirstInstallDate | When first time Windows set up this device |
| InstallDate | When it was last installed |
| LastArrivalDate | Means when last time it was plugged in |
| LastRemovalDate | When last time it was removed |
Method 2: Check USB Drive History on Windows 11 Using SetupAPI.dev.log
The SetupAPI.dev.log file is one of the most useful starting points for identifying USB device installation activity in Windows so let us begin here and examine the steps in detail below.
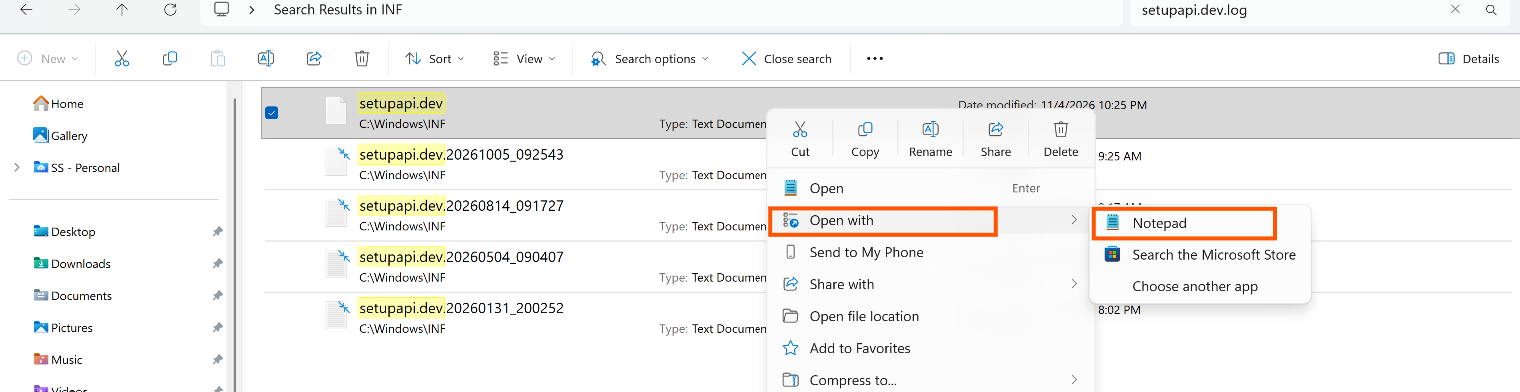
Windows creates this text-based log to record device installation and driver related information. It may contain details about USB devices that Windows has recognized and configured.
- Press Windows + R to start and open the Run dialog box.
- Enter the following location – C:\Windows\INF
- Press Enter to open the INF folder.
- Find the file named setupapi.dev.log.
- Here Right click the file and simply select Open with > Notepad.
- Now press Ctrl + F to open the search option.
- Search for terms such as USBSTOR, a device name or a known hardware identifier.
- You can examine matching entries and their associated dates also device information.
Practical tip: when registry contains too many entries here the best approach is simply search for the vendor ID (VID), product ID (PID) or identifier related to the USB device’s serial number rather than checking it manually each line.
Method 3: Check USB Drive History in the Registry (USBSTOR)
If you want to see the raw record or you are a IT admin then you should use the registry. Do not change or delete anything here. Only read.
Option A: Command line (This is safer than clicking around)
reg query "HKLM\SYSTEM\CurrentControlSet\Enum\USBSTOR" /s
Option B: Registry Editor
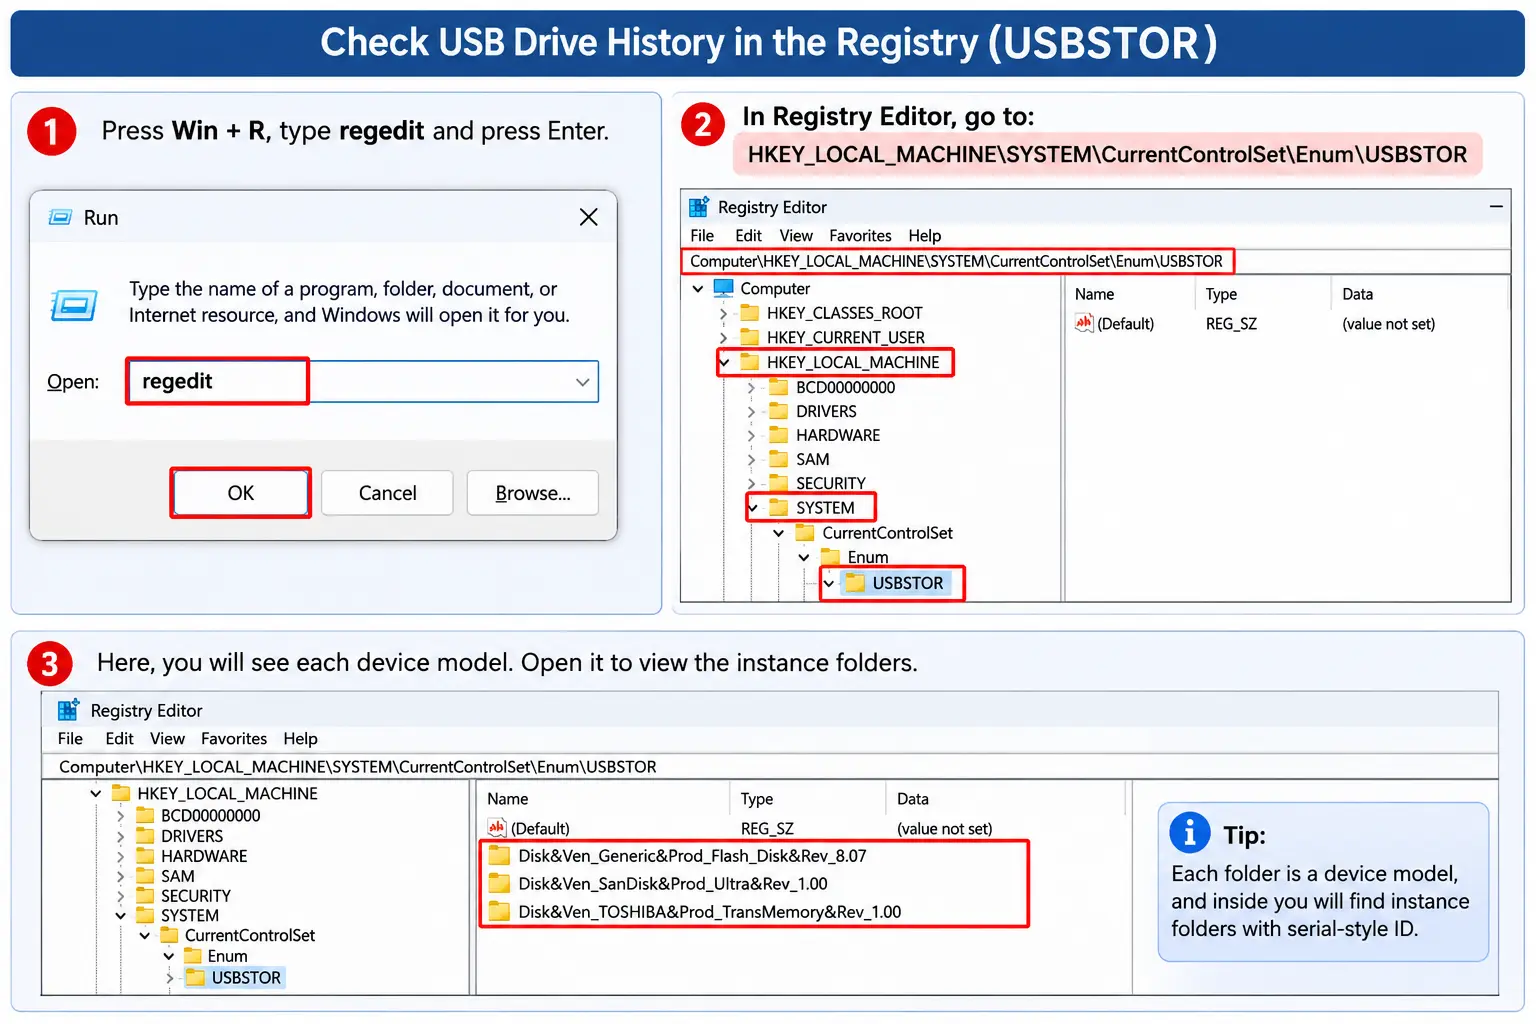
- You need to press (Win + R) and then type regedit thereafter press Enter.
- Now go to HKEY_LOCAL_MACHINE\SYSTEM\CurrentControlSet\Enum\USBSTOR.
- Here each folder is a device model. Inside it you will see instance folders with serial style ID.
Warning: If you are a beginner this is important for you to understand that deleting USBSTOR keys by hand can create problems with your PC. If you want to remove entry you must use the safe method in the removal section below.
Small Technical Fact: It is important to note that new USB drives utilizing the high speed UASP protocol are handled by a different Windows driver. So some storage devices may not appear in the same way under USBSTOR. If your list seems incomplete then you should also check the Device Manager.
How to See USB History in Device Manager (Hidden Devices)
This method is visual and good for beginners. Find below the steps that will help you see the USAB history.
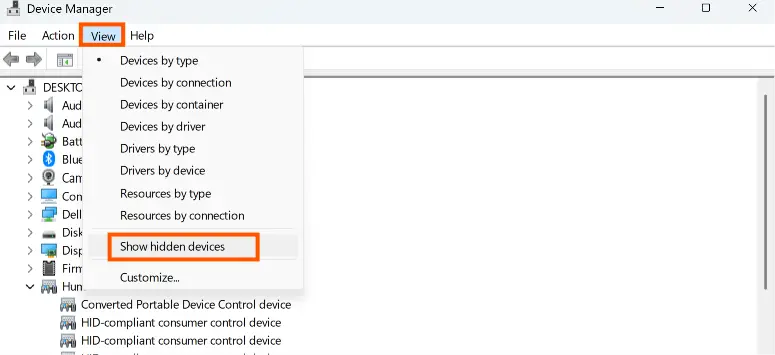
- Press Win + X and open Device Manager.
- Now click View > Show hidden devices.
- Expand Disk drives and Universal Serial Bus controllers.
- The items that appear in Greyed-out are devices that were previously connected but are not present now.
Method 4: Check USB Connection Events Using Event Viewer
Event Viewer is another useful Windows utility that you can use to examine system and device related events.
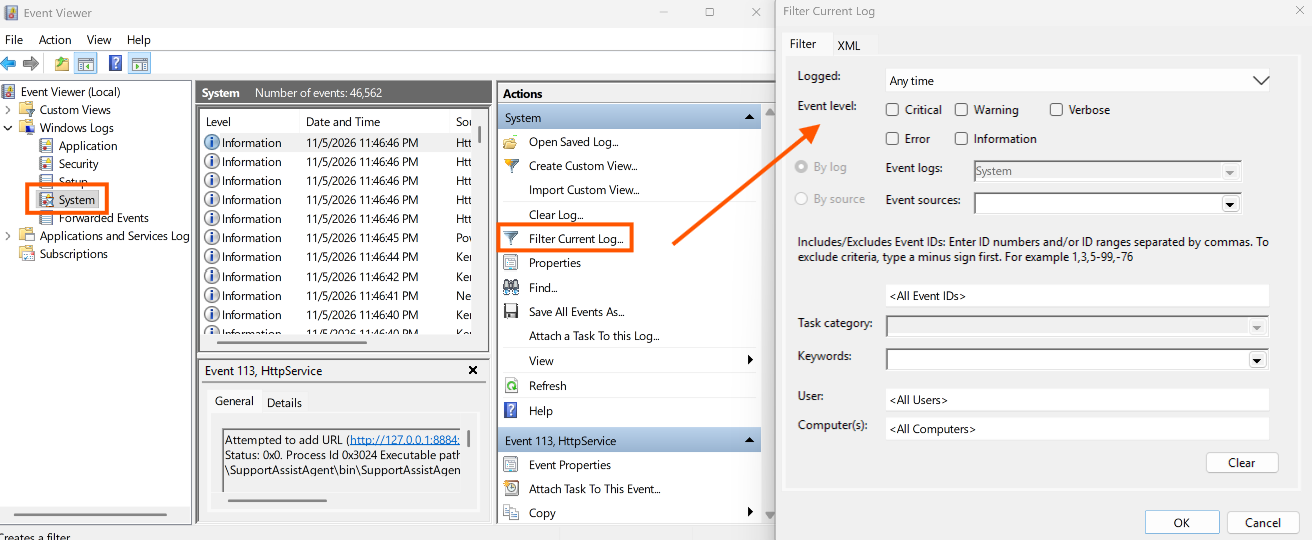
- Press Windows + R.
- Type eventvwr.msc and press Enter.
- Now expand to Windows Logs.
- Here select System.
- Click Filter Current Log from the right side panel.
- Review available events from sources like Kernel-PnP & other device related providers.
- Now open events to inspect their descriptions, timestamps and device related information.
How to Check If USB Was Plugged Into a Computer?
Do you want to be fully sure that your method works? If so then you need to try this 2 minute simple test:
- Plug in a pen drive and simply run the first PowerShell command. Copy its InstanceId.
- The next step is to safely eject and unplug it.
- Run the -PresentOnly command. The drive should be gone from this list.
- Now run the first command again. The drive should still be listed.
Now by following these above steps you have seen the history behaviour with your own eyes.
Can You See What Files Were Copied to a USB Drive?
This is the question that worries most users and managers as well. My honest answer is No, not from USB history alone.
USBSTOR shows you a device that was connected. It does not show you file names, copy direction or who did it. If you want to track file activity on removable drives here Windows has a policy known as Audit Removable Storage which can generate security events (such as event ID 4663) when files on removable media are accessed.
When Checking USB History Is Not Enough
Just imagine Meena runs a small accounting office where employees share computers containing customer tax files and bank statements. One evening employees connect their personal pen drive to the office PC so the next morning Meena decides to Check USB Drive History on Windows 11 using PowerShell and finds a USB storage device connected at 8:42 PM.
However she can not identify which files were copied or who connected the drive. The history only provides her device related information not exactly what she wants complete proof of data transfer.
Block USB Ports on Windows 11 to Prevent Data Leaks
For shared office computers and systems which are containing confidential files one of the best approaches is to block unauthorized USB access. As we saw in the example above PowerShell only provides information related to the device and it does not offer definitive proof. SysTools USB Blocker Tool is a complete solution for this problem as it provides a very simple way to block and unblock USB ports using password based authorization. This helps users to restrict unwanted USB access when employees or any other users are not authorized to connect external storage devices.
Conclusion
Now after reading this article you know exactly How to Check USB Drive History on Windows 11 by using PowerShell, registry and Device Manager can also help you in this. The record shows that a device was connected, not what was copied and not who did it. That is why checking history is very useful for answers but as usual we all know prevention is better for protection. You should make a monthly check habit, turn on auditing before you need it and block USB ports with a password on any computer that holds important data. SysTools gives you a simple way to do that without any technical settings.