

Quick Answer: Back up Bluehost hosting data (website, emails, and MySQL database) using cPanel, the native Basic Weekly Backup tool, premium add-ons (such as CodeGuard), WordPress Backup plugins (like UpdraftPlus, Jetpack Backup/Vaultpress), or professional tools such as SysTools advanced email backup software.
Do you know that according to the 2026 cybersecurity and IT reports, 67.7% of businesses experience major data loss annually?
In 2026, the stakes for website owners are incredibly high. Around 60% of small businesses permanently shut down within six months of a major data loss event -malware (31.2%) and system outages (30.1%) being the primary causes.
So, what’s the solution? How to fully secure your Bluehost account data?
According to IT experts, backing up your Bluehost hosting data is the best and most practical solution. This healthy practice ensures that your data remains safe from unexpected server crashes, a plugin update failure, or a cyberattack.
Now, if you’re wondering, “How to back up Bluehost account data?” or are already seeking a reliable method to do the same? Bookmark this guide immediately.
This comprehensive guide provides the exact methods (with simple steps) that professionals use to back up Bluehost accounts securely. From standard Bluehost backup methods to advanced tools to protect your complete hosting data.
So, let’s get started!
Does Bluehost Automatically Back up My Website, Emails, or Database?
Yes, Bluehost performs automatic backups on its shared hosting plans. But with limitations and no guarantees.
“Does Bluehost back up my site by default?” is a common question among new users. Indeed, this hosting service provider does offer a Bluehost automatic backup system for shared hosting accounts called Bluehost Basic Weekly Backup.
However, its official Terms of Service clearly categorize this as a “courtesy service”. And solely depending on this courtesy service and making it your primary backup strategy can be fatal. Because of the specific rules, limits, and potential fees (which will be discussed in the upcoming section) associated with it.
And, not backing up your Bluehost hosting data also exposes you to multiple dreadful scenarios. But what are those risks? You may ask!
Let’s find out what happens when reply only on Bluehost’s default backups and do not perform an independent backup.
What are the Risks of Not Backing Up Your Bluehost Hosting Data?
Failing to maintain independent Bluehost backups puts you at risk of the following catastrophic events:
- Malware and Ransomware: Industry research shows that WordPress sites are common targets for bots and hackers. So, if malicious code infects your crucial files and you do not have a clean backup, you may have to rebuild your entire website from scratch.
- Human Error: Mistakenly deleting the wrong file in the cPanel File Manager may remove your file permanently. It also includes dropping a table in your MySQL database and overwriting an important page. Without a dedicated Bluehost backup, these accidental actions can’t be rectified.
- Botched Updates: Sometimes, updating a WordPress core version, theme, or plugin can cause issues. Resulting in a stuck white screen. In such scenarios, a backup lets you instantly roll back to a working state.
- Hardware Failure: Data centers indeed have redundancies, but hardware does fail. And if the specific server storing your drive crashes permanently, the absence of an off-site backup makes it almost impossible to recover that lost data.
But, Why Must You Backup Your Bluehost Hosting Data?
The one profound reason why you must back up your Bluehost hosting data (website, emails, and database) lies in Bluehost’s own legal Terms of Service. Under the “Miscellaneous” section of the User Agreement, Bluehost clearly specifies that they are not legally liable if your data is destroyed or lost.
Here is the exact line from the Bluehost User Agreement:

“IT IS SOLELY SUBSCRIBER’S DUTY AND RESPONSIBILITY TO BACKUP SUBSCRIBER’S FILES AND DATA ON BLUEHOST SERVERS, AND under no circumstance will Bluehost be liable to anyone FOR DAMAGES OF ANY KIND under any legal theory for loss of Subscriber files and/or data on any Bluehost server.”
Bluehost again reinforces the same claim in the 4th point of Additional User Responsibilities:

“You will be solely responsible for backing up all Subscriber Content, including any Subscriber Websites off of Bluehost’s servers. This is an affirmative duty. Bluehost is not responsible for the loss of any Subscriber Content. Note: It is essential that Subscribers back up files offline, even if the user purchases or has products, such as CodeGuard and Site Backup and Restore.”
Hence, you have to take complete ownership of your Bluehost account data. And for that, you need to understand the importance of independent Bluehost backups.
The big takeaway:
- Bluehost legally absolves itself of any responsibility regarding your Bluehost hosting data. Hence, they’re not liable for failed backups, lost data, or data integrity.
- Your website, database, and emails are 100% your responsibility.
- To prevent disastrous data loss, you are required to use off-site backup plugins like UpdraftPlus. Exclusive services such as Jetpack or CodeGuard. And dedicated Offline email backup tools like SysTools advanced backup software.
People Also Find Helpful: How to Migrate Bluehost Email to Google Workspace?
Manual cPanel & Portable Methods to Backup Bluehost (Free)
Bluehost’s new Account Portal and standard cPanel interface allow users to generate complete or partial manual backups. These Bluehost backups are completely free. They can be physically stored on the local hard drive or external cloud storage.
Additionally, knowing how to manually back up Bluehost data ends the complete dependency on a third-party script. So, here is the accurate answer to “How to Create a Manual Bluehost Backup?”
The Full Account Backup (ZIP)
A full account Bluehost backup creates a large, compressed ZIP file containing the entire hosting account data. It includes home directory files, MySQL databases, email forwarders, and filters.
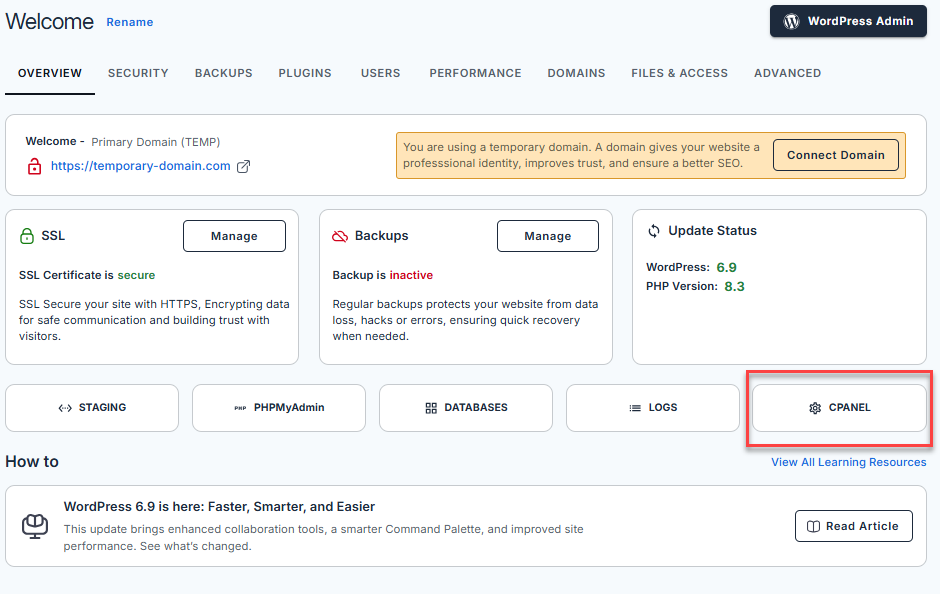
Step #1: Log into Bluehost and Launch cPanel
- Log into the Bluehost portal.
- Click Websites (in the left-hand menu).
- Select Manage Site (next to the website).

- From the Overview tab, click the cPanel button (to open it in a new tab).
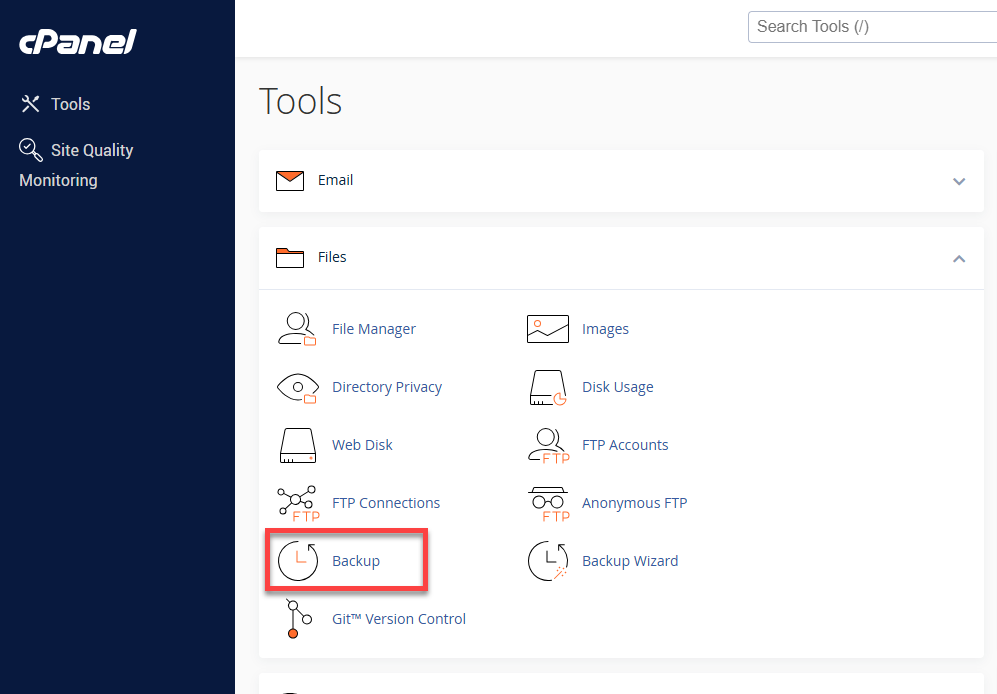
Step #2: Open the Backup Tool and Initiate the Full Backup
- Scroll down to the Files section.
- Click on the Backup icon.
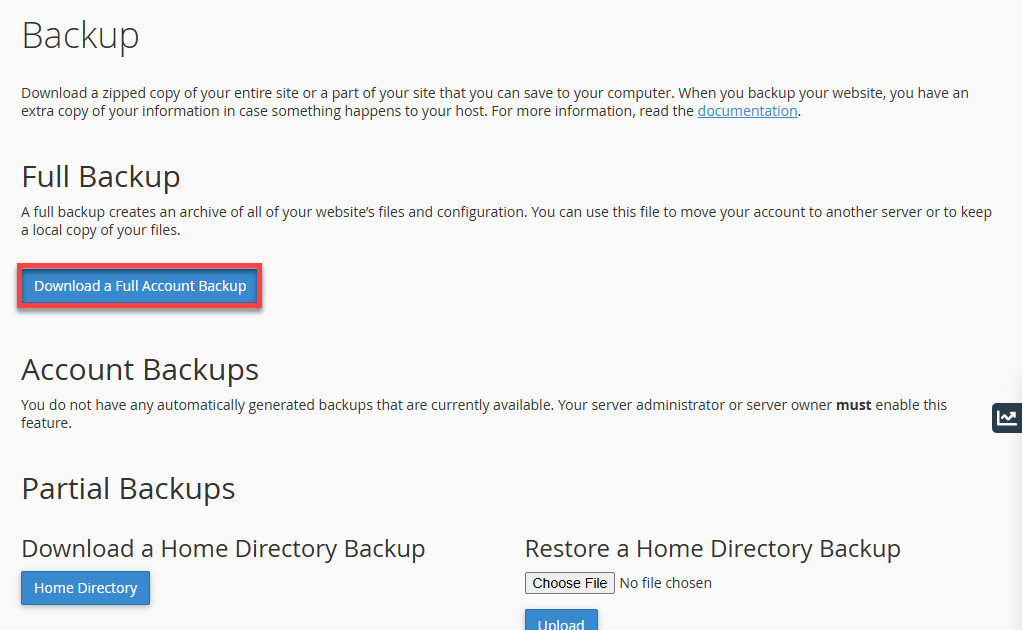
- Go to the Full Backup section.
- Click Download a Full Account Backup.
Step #3: Configure Destination
- Go to the Backup Destination dropdown.
- Select Home Directory.
- Enter the email address. It will send a notification when the backup is complete.
- Click Generate Backup.

Step #4: Download the file
- After receiving the email, return to the Backup page in cPanel.
- Look for “Backup Available for Download”.
- Click the generated .tar.gz link. It will save the Bluehost backup zip file to your computer.
And if you only want to back up one of the following components at a time:
- Website Files (cPanel File Manager)
- MySQL Database (phpMyAdmin)
- Emails (Webmail)
Bypass the Full Account Backup and jump straight to the component-specific steps.
Website Files (cPanel File Manager)
Want to back up only the website’s front-end files (themes, images, plugins, and main WordPress code)? If yes, simply bypass the database and compress the files directly. To do so, apply the steps shared below:
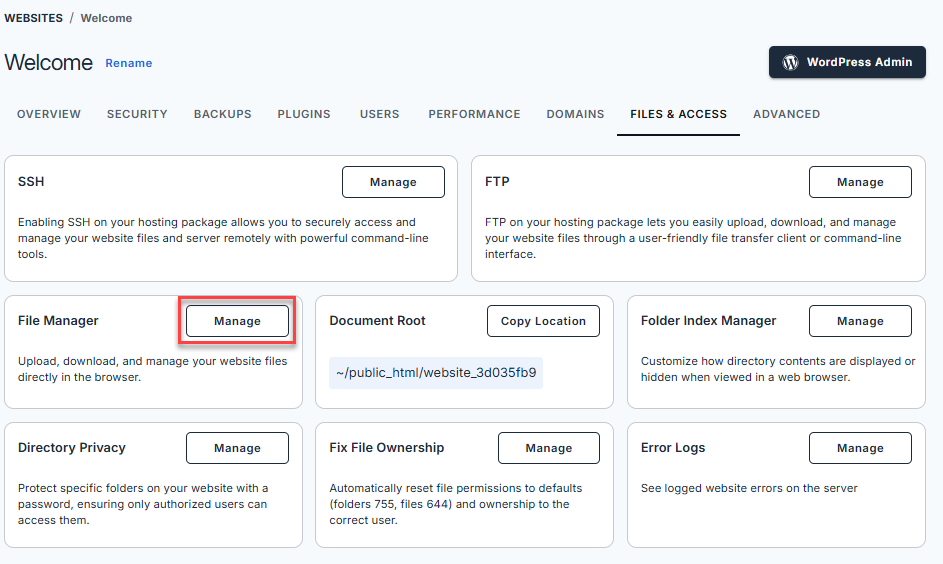
Step #1: Access File Manager
- From the Bluehost Portal, go to Websites.
- Click Manage Site.
- Select the Files & Access tab.
- Find the File Manager title.
- Click Manage.
Step #2: Uncover Hidden Files
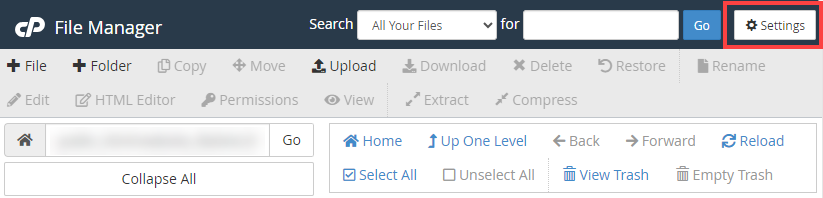
- Click Settings (in the top right corner of the File Manager.
- Confirm Show Hidden Files (dotfiles) is checked. It ensures critical files like .htaccess don’t get skipped.
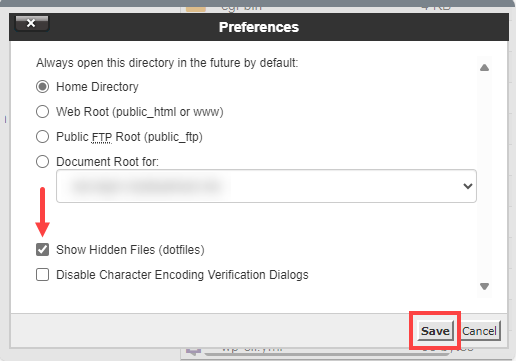
- Click Save.
Step #3: Find the Root Folder
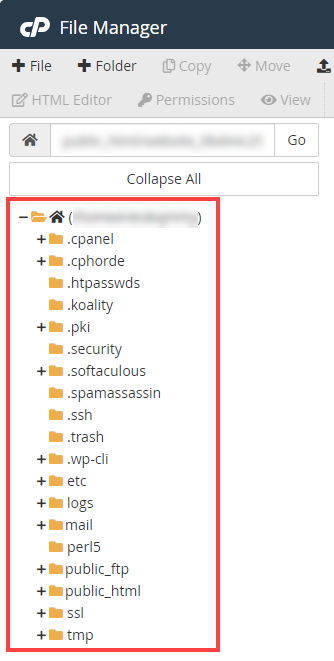
- Look at the left sidebar.
- Click on the public_html folder (for the particular folder where the site is installed).
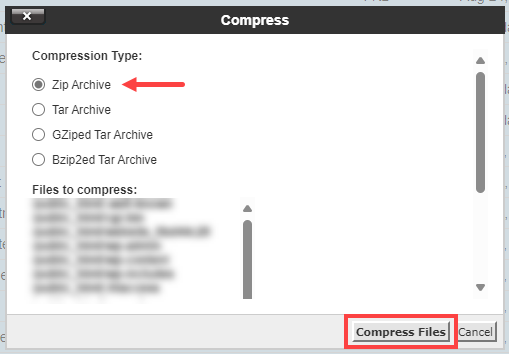
Step #4: Compress the Files
- Click Select All (at the top).
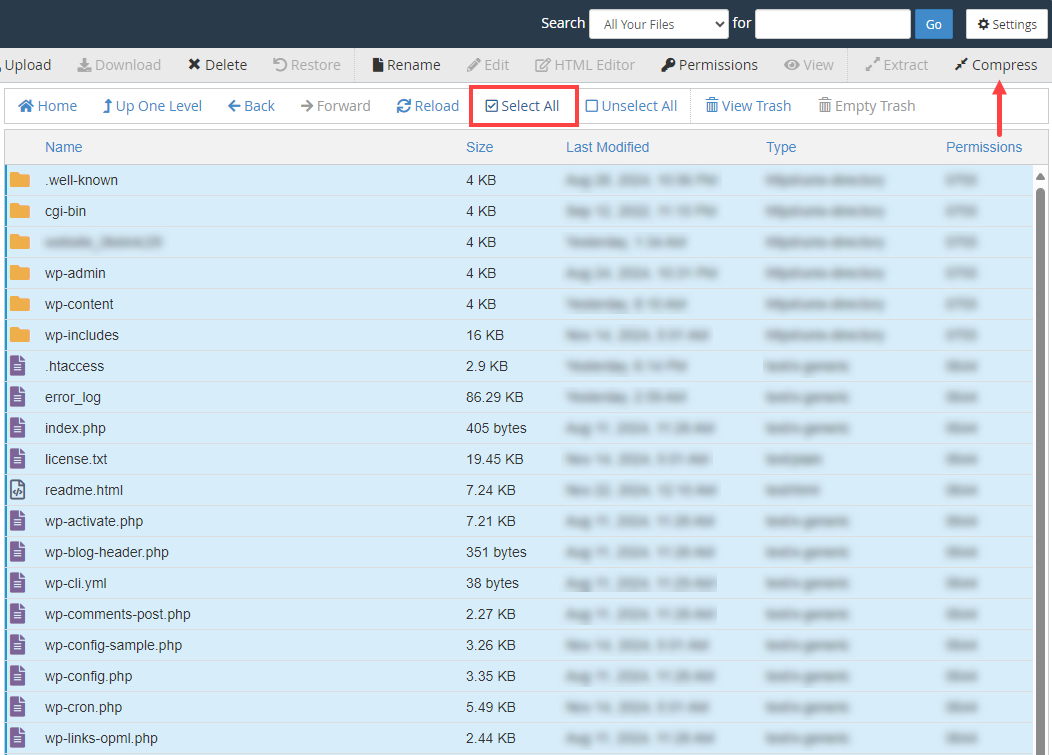
- Right-click the highlighted files.
- Choose Compress >> Select Zip Archive.
- Name the file >> Click Compress Files.
Step #5: Download the Zip
- Once the compression completes, find the new .zip file >> Select it.
- Click the Download button (in the top menu to save it locally.
Database (phpMyAdmin)
Exporting the MySQL database secures the actual content and settings of a dynamic website (like WordPress). To back up Bluehost’s database, follow the easy instructions shared below:
Step #1: Open phpMyAdmin
- Log into the Bluehost Portal.
- Click Websites >> Manage Site.
- Select the phpMyAdmin button (to launch the database manager).

Step #2: Select the Database
- Look at the left sidebar to see the list of databases.

- Click the database name linked with the website to expand its tables.
Step #3: Initiate the Export and Configure Export Settings
- Go to the top horizontal menu.
- Click the Export tab.

- Choose the Quick export method.
- Make sure the format is configured to SQL.
Step #4: Download the Database File
- Click the Go (or Export) button.
- A .sql file will instantly download to your computer.
Emails (Webmail)
Since Bluehost doesn’t provide a built-in, one-click “Download All Emails” button in the standard cPanel (for individual inboxes). Users are forced to back up emails manually via the webmail interface. So, let’s see how to back up emails using the webmail interface:
Step #1: Log into Webmail and Select Messages
- Go to the Bluehost Webmail portal (usually via Roundcube).
- Log into the account using the specific email address and password.
- Select the targeted email or thread to back up.
Step #2: Export the File
- Click the More icon (three dots or lines) in the top toolbar.
- Select Export (or Download). The email will be stored to the hard drive as an .eml file. It can be opened using any standard desktop mail client (like Outlook, Thunderbird).
But how do I back up my Bluehost emails in bulk?
When backing up my Bluehost hosting data, I also asked myself the same question. Since Bluehost doesn’t provide a “Download All” button for bulk email export in cPanel. After in-depth research, I found the incredible software IT professionals and business owners use to export bulk emails at once. Introducing to you, SysTools Email Backup Wizard.
A remarkably helpful, corporate-grade software that is capable of exporting complete mailboxes offline securely without breaking the data hierarchies. It bypasses Bluehost’s limitation entirely by connecting directly to a server via IMAP.
Core Capabilities for Bluehost Users:
- Multi-Format Export: It lets Windows users download their mailbox directly to PST (for Outlook), MBOX, EML, MSG, and PDF. And allows Mac users to export emails in additional formats such as HTML, CSV, and TXT.
- Delta (Incremental) Backup: To save significant time and bandwidth, this industry-favourite tool offers the “Delta Backup” feature. It only downloads newly arrived emails during future sessions.
- Delete After Download: It also offers the feature to automatically delete emails from the Bluehost server after they are successfully downloaded to the local drive. Facilitating dealing with Bluehost’s strict inode limits on shared hosting.
- Folder Hierarchy Preservation: This robust software keeps the exact folder structure, read/unread status, and metadata (To, CC, BCC, Attachments) effortlessly during the transfer.
How to Use SysTools to Backup Bluehost Emails?
Step #1: Download the software to your desktop.

Step #2: Select the backup option and IMAP server.

Step #3: Choose the destination to save the resultant data.
Step #4: Lastly, verify all settings and begin the email backup process.

Automated Bluehost & Premium Add-Ons
Here are the native & automated, and Premium add-ons to back up Bluehost account data:
Bluehost Basic Weekly Backup
Bluehost Basic Weekly Backup is a default, automated “courtesy backup system” provided to shared hosting customers. While it automatically backs up your Bluehost hosting data once a week, it functions under strict constraints such as:
- Random Backup Scheduling (determined by Bluehost’s server cycles)
- Zero Historical Archives (only one week of backups is stored at a time).
- Complete Overwrite (entirely overwrites the previous week’s backup).
- Limited Storage Limit (backups for accounts under 20 GB of total storage; do not back up exceeding 30 GB).
- Inode (File) limits (must be lower than 100,000 inodes for standard shared hosting backups; the legal cutoff is at 50,000 files.
Quick Explanation: An inode is an individual file, folder, or email.
- No Free or Instant Restoration (the basic courtesy backup is locked away on the server backend; it requires contacting Bluehost’s Support team via phone or chat. Also, a one-time fee is charged to complete the restoration request).
After all, it is engineered mainly for Bluehost’s own server maintenance instead of individual user disaster recovery.
Step #1: Access the Websites and Manage Site
- Log in to the Bluehost Portal.
- Click Websites (in the left-hand menu).
- Select the Manage Site (or Manage) button. It is located next to the website.
Step #2: Open the Backups Tab and Select the Backup Type
- Click the Backups tab (from the horizontal navigation menu).
- Look for File Backups (themes, images, plugins) and Database Backups (posts, users, text).
Step #3: Download or Restore
- Choose the preferred date of the backup.
- Click Download to save a .zip file locally.
- Or select Restore to automatically return the site to that specific date.
CodeGuard (Premium Add-on)
CodeGuard is a premium, industry-standard add-on that IT leaders use for comprehensive server backups. Even Blueshot itself highly recommends it for server -level backups. Also, it offers daily automated saves and advanced monitoring.
Step #1: Go to CodeGuard Settings
- Open the Bluehost portal.
- Go to Websites >> Manage Site.
- Click the Backups Tab >> select Manage (under the CodeGuard section).
Step #2: Add Server Credentials
- Click Add FTP/SFTP Website.
- Input the Website URL, Hostname/IP address, and SFTP/FTP username, password, and port number.
Step #3: Test and Select Directory
- Select Test Website Connection.
- Once it is successful, check the box (next to the root directory). Usually, it is public_html.
- Click Select Root Directory.
Step #4: Begin First Backup and Connect the Database
- Click Begin First Backup. CodeGuard will commence merging the files.
- Once the file backup begins, click Add Database.
- Type in the database hostname, username, and password.
- Check the connection to confirm the MySQL database is also backed up daily.
WordPress Backup Plugins (Independent Tools)
The following are the most-used, independent WordPress Backup Plugins that Bluehost experts use to export Bluehost data:
UpdraftPlus
UpdraftPlus is one of the most popular free and trusted backup plugins in the WordPress ecosystem to back up Bluehost account data. It functions independently of Bluehost’s internal server scripts. Allowing users to automatically package the website and send it to secure, third-party cloud storage (like Google Drive or Dropbox).
Also, the free version doesn’t back up the site automatically. And the automated safety feature is also locked behind the premium paywall.
Step #1: Install and Activate
- Log in to the WordPress dashboard.
- Go to Plugins >> click Add New Plugin.
- Search for “UpdraftPlus” >> click Install Now.
- Select Activate.
Step #2: Access Settings
- Move to Settings (in the WordPress left-hand sidebar).
- Click Updraft Backups (to open the main control panel).
Step #3: Configure the Backup Schedule
- Click on the Settings tab.
- From the Manual, modify both the “Files backup schedule” and “Database backup schedule” (to the preferred frequency: Daily or Weekly).
- Choose the number of historical backups to keep (retaining 2 to 4 is standard).
Step #4: Set Remote Storage
- On the same settings tab, click the icon of the preferred remote storage provider (Google Drive, Dropbox, or Amazon S3).
- Scroll down and click Save Changes.
- In the pop-up window, log in. This will authenticate the connection between UpdraftPlus and the cloud drive.
Step #5: Run the First Manual Backup
- Once authenticated, return to the Backup/Restore tab.
- Click the blue Backup Now button.
- Make sure the boxes for both files and databases are checked in the pop-up.
- Click Backup Now Again. It will push the first complete backup to the cloud.
Jetpack Backup/ VaultPress
Jetpack Backup (formerly VaultPress) is a premium, independent tool engineered by Automattic (the creators of WordPress) to back up Bluehost hosting data. This top-tier third-party software excels in real-time syncing. In other words, each time a user leaves a comment, publishes a post, or purchases a product, the database is backed up immediately.
It is also deeply integrated into the Bluehost ecosystem (especially for WordPress users).
Step #1: Find Jetpack in Bluehost
- Log into the Bluehost portal.
- Go to Websites >> click Manage Site.
- Click the Backups tab.
Step #2: Install Jetpack
- Find the Jetpack section.
- Click the Install Jetpack button. It will prompt the plugin to the WordPress dashboard.
Step #3: Authenticate Account and Select Plan & Sync
- Connect the site to the WordPress.com account.
- Log in or create a free account (to connect the service).
- Choose a Jetpack subscription (based on your Bluehost license). Once the subscription is activated, the initial backup will run automatically. It will save the data and protect off-site cloud servers.
Best Bluehost Backup Practices
Here are the best practices to back up Bluehost data conveniently:
#1: Apply the 3-2-1 (or 3-2-1-1-0) Rule
The 3-2-1-1-0 Bluehost backup strategy is the most recommended protocol by cybersecurity experts:
- 3 Copies of data: Try to keep the live website on Bluehost. Include two completely separate backup copies.
- 2 Different Media Types: Avoid storing both backups in the same cloud ecosystem. Keep one in cloud storage (like Google Drive or AWS) and another on a physical local hard drive.
- 1 Offsite Location: Store one Bluehost backup separated from Bluehost’s servers. It ensures that the data remains safe if Bluehost’s servers go down.
- 1 Air-Gapped/Immutable Copy: Keep a backup copy that is completely disconnected from the internet. Or cannot be edited or deleted by anyone for a set period ensures protection from ransomware.
- 0 Errors: Religiously review the backups to confirm they deploy with zero errors.
#2: Audit the Automated Backup
Assuming automated backup plugins are working perfectly is one of the most common mistakes webmasters make. This often results in an empty .zip file during the emergency.
- Review the log files stored in UpdraftPlus or CodeGuard. Look for “timeout” errors or warnings that signal backup failure.
- Deploy the backup to a local staging environment every 90 days. If the site loads accurately on the local machine, it means that the backup is verified and healthy. To do so, use free tools such as Local by Flywheel.
- Do not skip database validation. Make sure the exported .sql file matches the live post count and user data.
#3: Take a “Pre-Update” Safety Snapshot
Updating the website without a safety net can be risky. So, implement the following steps before updating the site and take a “pre-update” snapshot:
- Generate a complete manual cPanel Backup or CodeGuard snapshot. Because the major updates rewrite the fundamental architecture.
- Perform a quick database and file sync using the backup plugin (such as UpdraftPlus) instantly before clicking “Update All”.
- Confirm that the real-time backup (like Jetpack) has successfully synced the latest database entry, or manually export the .sql file.
#4: Focus on Security and Access Control
- Avoid using the same password for the Bluehost account. Including the WordPress admin and the external cloud storage (like Dropbox). Try isolating backup credentials.
- Configure the tools to retain only the last 3 to 4 historical versions. And automatically delete older files. Because old backups on the server consume inodes and slow down the site.
- Remove sensitive caches (like wp-content/cache) when setting up the backup tool. Otherwise, the backed-up cache files increase the backup size. And frequently prompt the automated tools to crash mid-process.
Also Check Out: How to Migrate Email from Bluehost to Office 365? Quick Solution
The Takeaway
This thorough guide, designed especially for Bluehost users, accurately answers the most common question among new users: How to back up a Bluehost website, emails, or database?
It precisely shares all the manual methods and advanced tools Bluehost professionals use to back up Bluehost hosting data (of individual or multiple users). So, choose the method that aligns with your needs and fits your budget to download the Bluehost account data.
For any technical support or general queries, get in touch with us at [[email protected]] or [[email protected]].
FAQs (Frequently Asked Questions)
Q.1: Can I use free plugins to back up my Bluehost WordPress site?
Absolutely, yes! By using free WordPress plugins like UpDraftPlus or Duplicator to back up your Bluehost WordPress site. This free software allows you to save your site files and databases. For automated schedules, link the plugin to an external cloud storage provider like Google Drive.
Q.2: Does Bluehost automatically back up my website?
Yes, Bluehost performs automatic backups on its shared hosting plans. But with limitations and no guarantees. Bluehost’s official Terms of Service clearly categorize this as a “courtesy service”. And completely relying on this courtesy service can be risky.
Q.3: How do I back up my Bluehost emails?
- Go to the Bluehost Webmail portal (usually via Roundcube).
- Log into the account using the specific email address and password.
- Select the targeted email or thread to back up.
- Click the More icon (three dots or lines) in the top toolbar.
- Select Export (or Download). The email will be stored to the hard drive as an .eml file. It can be opened using any standard desktop mail client (like Outlook, Thunderbird).
Q.4: How do I restore my Bluehost backup if my site breaks?
- Log into the Bluehost Account Manager.
- Click on Websites (in the left menu).
- Select Settings or Manage Site (next to the website).
- Click the Backups tab (at the top of the page).
- Check the date and time to find the preferred backup version.
- Click the Vertical ellipsis (three dots) next to the backup.
- Select Restore >> confirm the choice >> wait 5 to 5 minutes for the process to finish.