

Quick Answer: The fastest way to attach an email to another email in Outlook (Desktop App on Windows) is the Drag-and-Drop method. To use this:
- Open a New email window.
- Resize the window to see the inbox list at the same time.
- Click and hold the target email to attach from the inbox.
- Drag the email straight into the body of the New Email window.
- Release the cursor. The email will instantly appear as a .msg attachment.
Attaching an email to another email in Microsoft Outlook converts the original message into a .msg or .eml file. This practice maintains the original formatting, metadata, and attachments.
So, if you’re looking for a quick and reliable way to “How to attach an email to another email in Outlook?” or “How to put an email inside another email in Outlook,” then you must be:
- Escalating a support ticket
- Sharing critical client communication with your team
- Keeping the exact headers of a malicious message for the IT department.
If I have guessed it right, stay tuned till the end! This step-by-step guide will share the 5 direct and effective methods to attach an email to another email in Outlook across Desktop, Web, and Mac with you!
Also Read: Here’s How to Add Emojis in Outlook Emails🤔 (In All Outlook Versions✅)
How to Attach an Email to Another Email in Outlook?
There are 5 standard ways through which IT professionals, administrators, powers users attach emails to another email in Outlook Classic, New Outlook for Windows, Outlook on the Web, and Outlook for Mac:
1. The Drag-and-Drop Method
2. The “Forward as Attachment” Ribbon Button
3. The “Attach Item” Feature
4. The Right-Click Context Menu
5. The Copy & Paste Hack
Let’s check them out one by one!
Method #1: The Drag-and-Drop Method (Fastest)
The drag-and-drop method is the intuitive and fastest way to attach an email to another email in Outlook. It bypasses the ribbon menu completely. So, if you’re wondering, “ Can I drag and drop an email into a new email in Outlook?”, the answer is a strong yes!
Pros:
- Fast, highly visual, works natively with inline replies.
Limitations:
- Requires both the inbox and the draft window to be visible.
- Misclick risks (dropping into a random subfolder in the navigation pane)
- Security protocols can block the drag-and-drop function entirely (running Outlook in Administrator mode).
Steps to drag and drop:
- Click the “New Email” button (in the top left corner of the Outlook client or press Ctrl + N).
- Minimize and move aside the new message window. The new email draft and main Outlook inbox list must be visible at the same time.
- In the inbox list, click the target email to attach. To attach multiple emails at once, hold down the Ctrl key >> select each additional email.
- Left-click and hold the selected emails.
- Drag the cursor over to the body of the new email draft. The cursor will change to include a “+” symbol or a “Drop messages here”
- Finally, release the mouse button to drop the files into the attachment line.
Pro-Tip: If you’re already replying to an email directly within the reading pane (an “inline” reply) instead of a pop-out window, you’re not required to open a new window to use this method. SImply:
- Click the target email to attach from the inbox list.
- Drag it directly into the body text of the opened inline reply. Once dragged, Outlook will instantly convert the dragged email into an attachment within that active thread.
Method #2: The “Forward as Attachment” Ribbon Button
The “Forward as Attachment” ribbon button is the most preferred method for IT administrators, compliance officers, and structured workflows.
But why? Because unlike the drag-and-drop method, this method doesn’t
alter the formatting when the text of the previous mail pasted into the new draft. It provides the untouched .msg file.
This method is especially convenient for users who need to send multiple emails to a single recipient. Such as, forwarding several error reports to a helpdesk at once.
Pros:
- Preserves the exact internal headers, metadata, and routing data of the original email.
- Excellent for batches; allows packaging 10+ emails into a single outgoing message with a single button.
- Can bypass any Windows UAC (User Account Control) restrictions (that block drag-and-drop actions).
Limitations:
- Requires a new draft; cannot be used to attach an email to a draft already being written.
- Attaching multiple large emails can quickly exceed the organization’s outgoing size limit (typically 25 MB to 35 MB).
For Classic Outlook (Desktop Client)
- Click on the target email (in the inbox list). To attach multiple emails at once, hold down the Ctrl (or Cmd on Mac) >> click each specific email one by one.
- Look at the ribbon (top navigation bar in Outlook) >> make sure you’re on the “Home” tab.
- On the ribbon, click “More” (small document icon) >> select “Forward as Attachment”.
- A new message window will pop up immediately. The selected emails will already be present in the attachment line.
- Add the recipient >> type the content >> hit “Send”.
For “New Outlook” (Windows 11) & Outlook Web
- Open the “New Outlook” or “Outlook on the Web”.
- Hover over the emails in the inbox list >> click the checkboxes (next to the sender’s avatar) to select one or multiple messages.
- Look at the simplified ribbon (at the top of the reading pane).
- Click the “three-dot menu (…)” next to the standard Reply/Forward buttons. Or click the drop-down arrow (next to the “Forward” button).
Pro-Tip: The Ultimate Power User Shortcut (All Windows Versions)
The following keyboard shortcut bypasses ribbon navigation, offering the forensic benefits of the “Forward as Attachment” method with the speed of drag-and-drop.
- Click on the email (or highlight the emails in the inbox)>> press Ctrl + Alt + F (or Cmd + Alt + F) simultaneously.
- A new message window will trigger instantly with the selected emails attached.
Method #3: The “Attach Item” Feature
The native “Attach Item” feature provides full mailbox access and allows attaching an email to another email without abandoning or minimizing the current email draft.
Simply eliminates the process of closing the current draft, going back to the inbox, and using the “Forward as Attachment” command all over just to add the conversation as a reference.
Pros:
- Allows browsing the entire mailbox hierarchy from inside the active email draft.
Limitations:
- Requires navigation through multiple ribbon menus and a pop-up dialog box.
- No quick search bar; required to manually scroll through the folders to locate the specific email.
Steps to use the “Attach Item” feature:
- In the active email draft, click the “Insert” tab (on the ribbon menu at the top of the window).
- Look for the “Outlook item” button (or click Attach Item>> Outlook item button).
- The “Insert Item” dialog box will pop up.
The top half shows the mailbox folder structure (Inbox, Sent Items, Archives). The bottom half displays the individual emails (select the folder to see).
- Go to the correct folder >> select the target email.
- Under the “insert as” heading, set the radio button to “Attachment” >> click “OK”.
Pro-Tip: To avoid pasting a large block of unformatted text into the current email draft, always cross-verify that the “Attachment” radio button is selected instead of “Text-Only”.
Method #4: The Right-Click Context Menu
The Right-Click Context menu is the definitive answer for users on the “New Outlook” for Windows, Outlook on the Web (OWA), or Outlook for Mac. This is because the classic ribbon menus have been simplified for them; either it is hidden behind sub-menus or missing completely.
Pros:
- Universal interface; identical across New Outlook, Outlook on the Web, and Outlook for Mac.
- In just two clicks generates a new draft with the file attached.
- Universal file format; packages the email as an .eml file that can be opened natively by Apple Mail, Thunderbird, and Gmail.
Limitations:
- In some browsers, right-clicking might trigger the browser’s native menu instead of Outlook’s menu (specifically if extensions are interfering).
- Requires a new Draft; doesn’t allow adding an attachment to an active reply (already writing).
- Breaks legacy compliance; the new .eml default may affect the workflow if proprietary .msg files are required for internal eDiscovery.
Steps to apply the Right-Click Context menu:
- Scroll through the message list (in New Outlook, OWA, or MAC) >> find the target email.
- In the list view, right-click on the email. A context menu will pop up.
- Scroll down the context menu >> click “Forward as Attachment”.
- A new draft will immediately open (with the targeted email attached in the header line) >> enter the recipient >> click “Send”.
Method #5: The Copy & Paste Hack
Standard Windows clipboard commands (such as Ctrl + C and Ctrl + V) function effortlessly in the Classic Outlook desktop client. This makes it another workaround to attach an email to another email in Outlook.
Pros:
- Uses universal copy/paste commands; no new shortcuts are required to learn.
- Allows attaching an email into the active reply.
Limitations:
- Often struggles in Outlook on the Web and New Outlook.
- Might paste a large block of unformatted text if emails are pasted into Outlook’s rich-text field instead of HTML.
Steps to use the “Copy & Paste” method:
- Click on the email (or select multiple emails using the Ctrl key) in the main inbox list.
- Press Ctrl + C. This will copy the item to the Windows clipboard.
- Open a new email draft (or go to the reply being actively written).
- Click into the blank message body (the HTML text area) of the draft. Avoid leaving the cursor in the “To” or “Subject” fields.
- Lastly, press Ctrl + V. Outlook will convert the copied email from the clipboard into a .msg attachment in seconds. It will place it in the attachment line (just below the subject).
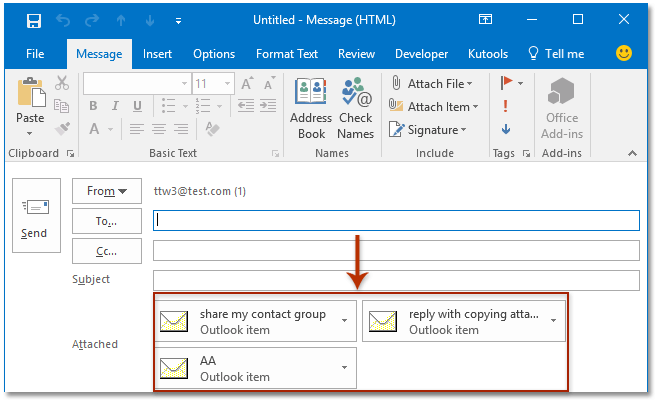
Pro-Tip: To make certain the copy & paste hack works all the time, always click into the main body text area of the email before pressing Ctrl + V. Outlook will recognize the attempt to insert an object. It will automatically redirect it to the attachment header.
Stop Forwarding Emails for Archiving: Ultimate Solution for Professionals
Attaching emails is an effective tactic for sharing context in a single conversation. However, treating it as a reliable data retention or backup strategy could prove fatal for business communications.
This is because many enterprises rely on employees manually forwarding .msg files to a central inbox to “save” critical communications. And this practice creates:
- Data silos
- Accidental Deletions
- Compliance complexities during eDiscovery.
In practical terms, attaching emails to preserve critical business data puts your Microsoft tenant at risk.
The Ultimate Solution: Automated Email Backups
Deploying an automated, tenant-wide solution to back up emails is a savvy decision to protect privileged business data. This bypasses the time manual packaging and forwarding emails. Including its potential drawbacks.
And for backing up critical enterprise communications, IT experts prefer the SysTools Office 365 Backup & Restore tool. This corporate-grade utility allows you to securely and automatically back up complete Microsoft 365 mailboxes.
Here are some of the headlining features that make it the first choice for IT professionals and administrators across the globe:
- Comprehensive Tenant Coverage: Backs up Office 365 emails, contacts, calendars, and documents offline. Including Shared Mailboxes and In-Place Archive data.
- Universal File Formats: Exports M365 emails into universally accepted file formats such as .eml, .pst, or .pdf.
- Preserves Hierarchy: Proficient in maintaining the original folder structure (Inbox, Sent, Custom Folders) to meet industry standards and compliance
- Bulk Backups: Allows downloading Office 365 Outlook mailboxes in bulk.
- Incremental Backup: Provides the “Delta Backup” feature to capture only newly added data in the mailbox.
- Precise Archiving: Allows selective backups through granular features like “Date Filter”.
- Sheer Compatibility: Available for various Windows and Mac OS versions.
So, stop relying on manual forwards to preserve & protect data. Secure your tenant’s critical data proactively with SysTool advanced backup utility.
- How to Enable Categories in Outlook 365? Step-by-Step Guide
- Outlook New Email Notification Not Showing? Fix It Fast in New Outlook
- Resolve Microsoft Outlook Email Error Codes & Messages Effortlessly – 2026 Guide
- Why Is My Outlook Not Receiving Emails? 13 Fixes to Try! (2026)
- How to Fix Body of Email Not Showing in Outlook: Step-by-Step Guide
FAQs (Frequently Asked Questions)
Q.1 How to attach an email in Outlook for Mac?
Here’s how you attach an email in Outlook for Mac:
- Select the target emails in the message list.
- Right-click and choose “Forward as Attachment”.
- A new compose window will appear with the emails attached as .eml files.
Q.2 How to attach an email in Outlook Web App (OWA)?
- Click “New Message” to start the draft.
- [If in the split-screen view] Simply drag and drop the email from the message list into the composition pane.
- Alternatively, right-click the email in the list >> select “Forward”. It will attach the previous conversation.
Q.3: How do I attach multiple emails to one email at the same time in Outlook?
- Open a new email window.
- Keep the inbox or email window visible next to it.
- Hold down the Ctrl key (or Command on Mac) to select individual emails. Hold down the Shift key to select a consecutive group of emails.
- Click and drag the selected emails directly into the body of the new email message.
Q.4: How do I forward an email without the messy forwarding history?
- Open a new message (click “Compose” or “New Email”).
- Type a clean subject line (like the original subject with “FWD:” removed or updated).
- Open the original email >> select & highlight only the particular text or message body to share >> copy it.
- Paste the text into the new message body.
- Remove any remaining quote marks, old timestamps, or sender details (if they paste over).
- Enter the final recipient’s address >> hit “Send”.
Q.5: How do you save an Outlook email as a PDF so you can attach it?
- Open the email you want to save as a PDF.
- Click “File” >> select “Print” >> choose “Microsoft Print to PDF” (under the Printer drop-down menu).
- Click the “Print” button >> choose the destination and name the file to save it on the computer.
- Hit “Save”.
- Open an existing reply or create a new email.
- Click the “Attach File” button (in the message ribbon).
- Find and select the newly saved PDF file.
- Click “Insert” to attach it to the new message.
Q.6: How to forward multiple emails at once in Outlook?
Classic Outlook and Outlook on the Web:
- Go to the “Home” menu >> click “Forward” (or press Ctrl + F).
- A new email will open (with all the selected messages attached).
- Enter the recipient address >> type the text >> click “Send”.
New Outlook for Windows:
- Open a new email draft window.
- Choose the email or group of emails (using the Ctrl or Shift keys).
- Drag and drop the selected emails directly into the open draft window to attach them as files.
Q.7: What is the keyboard shortcut to forward an email as an attachment?
Ctrl + Alt + F (or Cmd + Alt + F for Mac) is the keyboard shortcut to forward an email as an attachment. Simply select the email or multiple emails >> Press Ctrl + Alt + F >> type the recipient’s address >> click “Send”.
Q.8: Why can’t I attach an email to another email in Outlook Web?
This is because the traditional “Attach Item” button is missing in the web version. Nevertheless, you can simply put an email inside another using drag-and-drop or the “Forward as attachment” option.